


- Open the control panel
- Log in to the panel directly
- Power controls
- Usage and graphs
- Rebuild (reinstall the OS)
- Browser console (VNC)
- Reset the root password
- Rescue mode
- Boot settings
- Network
- Storage and sharing
- Changing your plan
- Legacy VPS plans (Select, Advanced, Ultimate)
- Locating
- Server Details / Additional Information
- Power Control
- Reinstallation
- Console
- IP Assignments
- Graphs
Your VPS has its own control panel, separate from the Game Panel. You open it from the Client Area, and it’s where you power the server on and off, rebuild it, open the browser console, reset the root password, and check usage.
Open the control panel
- Log in to the Client Area and open your VPS from Services → My Services.
- In the Manage box, click Open Control Panel. The panel opens in a new window and signs you in automatically.
- If the new window doesn’t open, use the Click here link under the button to open the panel in the same window.
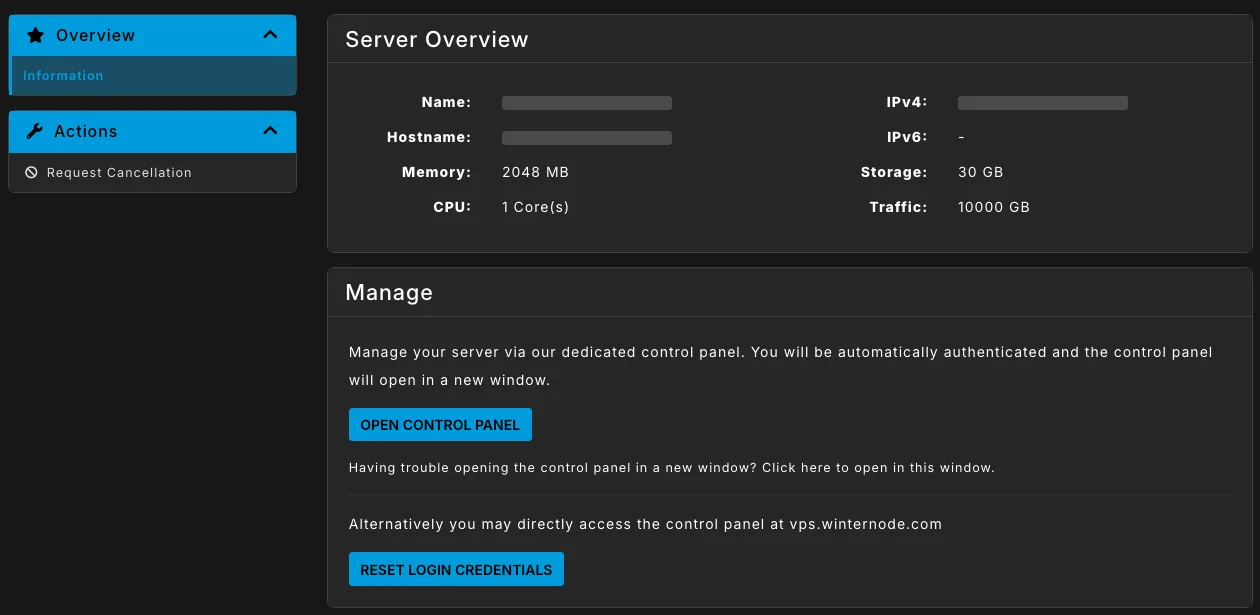
The Server Overview box on the same page shows your server’s name, hostname, IPv4 address (and IPv6 if one is assigned), memory, CPU cores, storage, and monthly traffic allowance.
Log in to the panel directly
You can also go straight to vps.winternode.com, or use Services → VPS Panel in the Client Area menu. To sign in there you need a panel password:
- On your VPS service page, click Reset Login Credentials.
- Your panel email and a new password are shown once. Save them somewhere safe before you leave the page.
This is your control panel login, not your server’s root password. For the root password, see Login Credentials.
Power controls
The Overview tab shows whether your server is Running or Stopped, along with the power buttons.
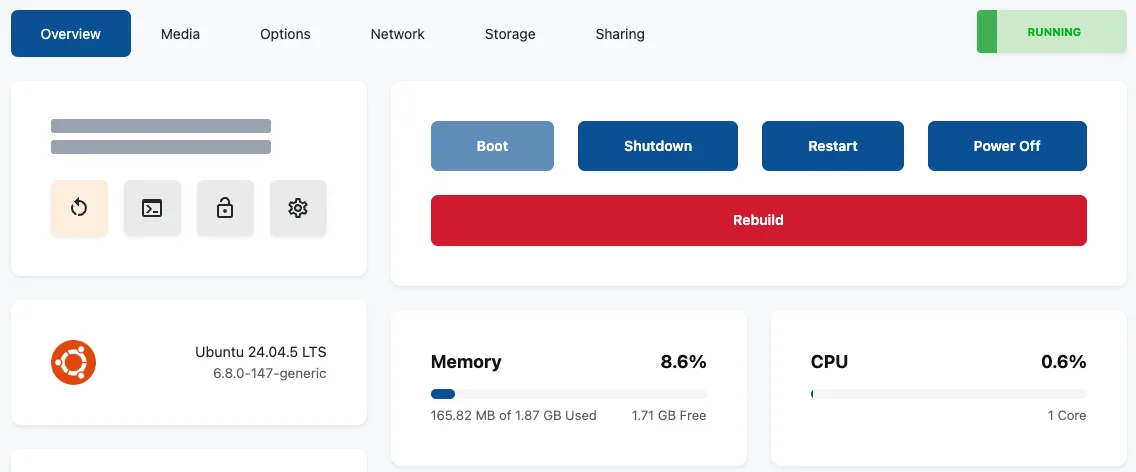
- Boot starts a stopped server.
- Shutdown asks the operating system to shut down cleanly. The server decides when to stop, so it can take a moment.
- Restart restarts the server.
- Power Off turns the server off immediately without warning the operating system, like pulling the plug. Use it only when Shutdown doesn’t work.
- Rebuild reinstalls the operating system. See Rebuild below.
The icon buttons under your server’s name are shortcuts:
- Restart (circular arrow).
- Console (terminal icon), shown while VNC is enabled. See Browser Console.
- Protect (padlock). Turning protection on stops the server from being rebuilt by accident. Turn it off before you rebuild.
- Settings (gear) changes the server’s name and hostname. A new hostname is only applied to the server the next time it’s rebuilt.
Usage and graphs
The Overview tab shows current memory and CPU use, plus a Network box with inbound, outbound, and total traffic for the current monthly period against your allowance. See Bandwidth Limits.
Expand Statistics on the same tab for graphs of network traffic, CPU, and memory. Pick a time range at the top: 30 minutes, 1 hour, 12 hours, 1 day, or 1 week.
Rebuild (reinstall the OS)
- On the Overview tab, click Rebuild, then Continue. (If Protect is on, turn it off first.)
- On the Server Setup page, check the Name, Hostname (optional), and Timezone.
- Under Operating System, open a family and pick a version:
- AlmaLinux: 9, 10
- CentOS: Stream 9
- Debian: 12, 13
- Fedora: 43, 44
- Rocky Linux: 8, 9, 10
- Ubuntu Server: 22.04 LTS, 24.04 LTS, 26.04 LTS
- Other: Oracle Linux 9
- Choose your options:
- SSH keys: select a saved key or add a new one. Selected keys are set up for the root user, and password login is turned off. If you don’t add a key, password login stays on and the new root password is emailed to you once the server is built.
- Swap space: none, or 256 MB up to 1.5 GB. Swap is taken from your disk.
- Click Install with your chosen OS.
Changed your mind? Click Cancel Rebuild at the top of the Server Setup page before you click Install, and your server is left as it was.
Browser console (VNC)
The browser console lets you use your server as if you had a screen plugged into it, even when SSH isn’t working. Turn it on under Options → VNC. See Browser Console for the steps.
Reset the root password
- Make sure the server is Running.
- Go to Options → Password and reset the password.
- The new root password is emailed to you.
The reset works through the QEMU guest agent on your server. If you’ve removed the agent, the reset fails.
Rescue mode
Rescue mode boots a small Linux system (Debian Live) instead of your normal one, so you can fix boot failures, broken configs, or a damaged filesystem.
- Go to Options → Rescue and click Create Rescue Session.
- The server restarts automatically, and the connection details are emailed to you once the session is active.
- When you’re done, click End Rescue Session to boot back into your normal system.
Boot settings
Under Options → Settings you’ll find the boot type (BIOS or UEFI) and Auto Configuration. Leave Auto Configuration on if you’re using one of our operating system images: it applies your network settings automatically.
Network
The Network tab lists your IPv4 address with its gateway, netmask, reverse DNS (RDNS), and DNS resolvers.
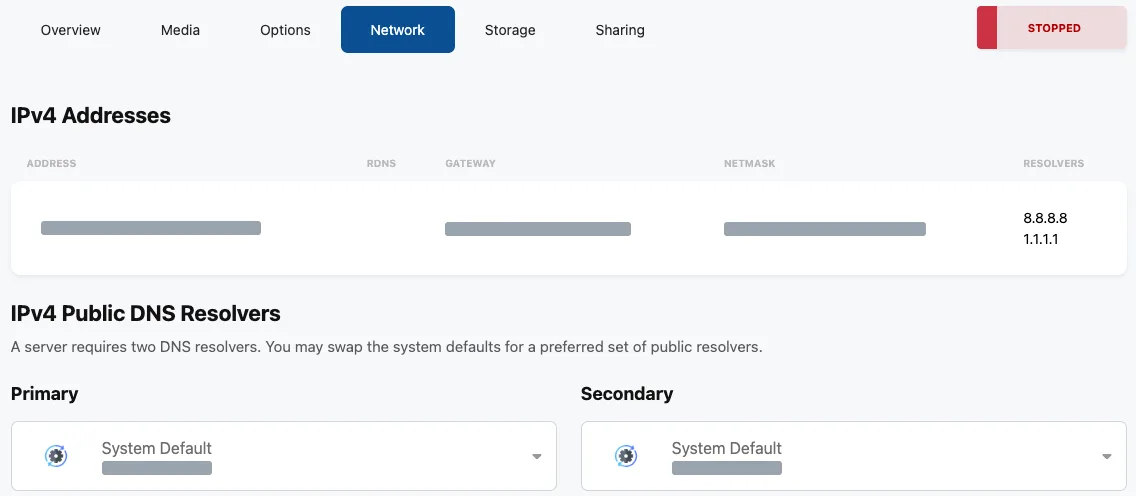
- DNS resolvers: pick a primary and secondary resolver: System Default, Quad9, Cloudflare, Google, or OpenDNS.
- Reverse DNS: the RDNS column on this tab is view-only. You can’t edit it from the panel.
Storage and sharing
- The Storage tab lists your disk and its size.
- The Sharing tab lets you grant someone else access to this server in the panel.
Changing your plan
To change your VPS’s CPU, memory, or storage, open a support ticket and we’ll resize it. Storage can grow but can’t shrink.
Legacy VPS plans (Select, Advanced, Ultimate)
These steps are for Select, Advanced, and Ultimate VPS services, which run on our previous VPS platform. In addition to the Server Control Panel, you can control these servers using the Client Area.
Locating
You can easily locate the Control Area for your service in the WinterNode Client Area by logging into the Client Area and selecting the “Manage Service” button on the service you want in the “Active Products/Services” pane.

Server Details / Additional Information
You can find a significant amount of information about your VPS Service in the “Server Details/Additional Information” pane.
Server Details
- Hostname - A human readable name for you and other computers to identify, can be nearly anything you want.
- Server Description - A description for your server used in the panel.
- Server Tags - Short descriptors for your server that can be used to group it with other servers when using the API or performing searches.
- Last BW In / Last BW Out - The most recent bandwidth in and out measurements.
- Bandwidth Usage - Your total bandwidth usage for this billing period.
Additional Information
- Operating System - Your server’s current operating system. Can be changed by reinstalling.
- Core(s), Memory(GB), Disk Space - The resources allocated to your server.
- IPv4 Addresses - The total number of IPv4 addresses assigned to your server.
- Bandwidth - Your service’s total bandwidth cap.
Power Control
Power Off- Power Off your server by sending a “Shut Down” signal, giving your server a chance to safely respond. Leaves the server in a powered off state.Reset- Forcibly shut down and restart your server. Does not let the server respond before shutting off.Reboot- Restarts the server by sending a “Restart” signal, giving your server a chance to respond and the server will immediately restart itself. Some things require a full “Power Off” and “Power On” in order to complete safely.Power On- Power On the server when it’s off. Will only be visible when the server is Offline.

Reinstallation
You can install or reinstall a number of default operating systems and versions using the “Reinstallation” section, located under the “Server Details/Additional Information” pane.
Power Offyour server.- Open the “Select version” drop down of the operating system you want to install.
- Select the version you want to install.
- Fill out the provided configuration options.
- The hostname can be nearly anything you want. It’s just a label for your device meant to be readable to humans like you!
- Click
Start Reinstallation.- Remember, this is destructive!!
After you start the installation, you should be presented with a modal similar to the one shown to the right showing the progress of the installation. If it doesn’t complete after 5 minutes, reach out to us via a Support Ticket or Discord.

Console
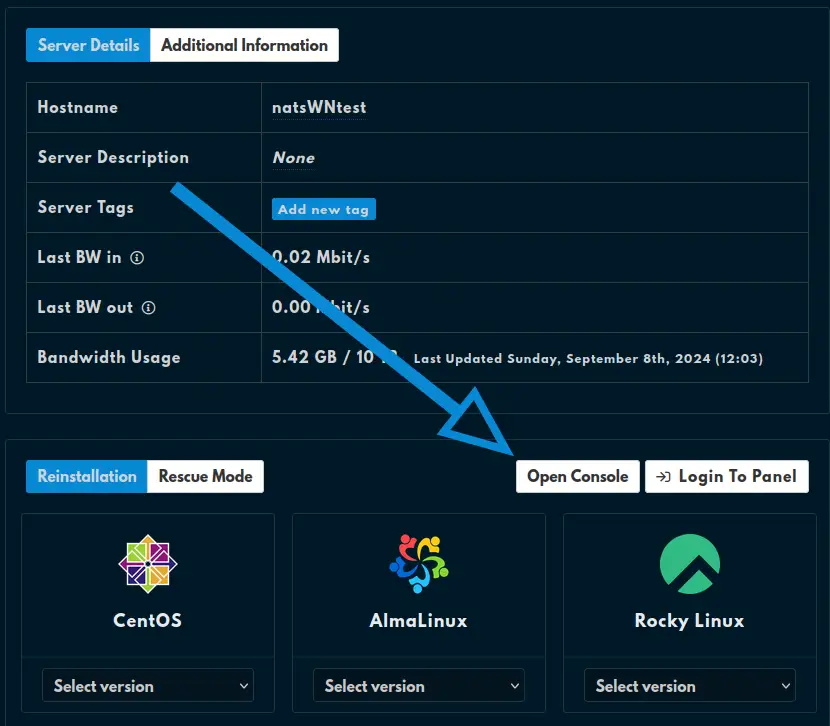
You can open a NoVNC session from the Client Area by selecting the “Manage Service” button for your server from the “Active Products/Services” list then scrolling down below the “Server Details/Additional Information” pane. Next to the “Reinstallation/Rescue Mode” buttons is the Open Console button which will open a new tab containing the NoVNC session.
IP Assignments
The IP Assignments table contains information about the IP addresses assigned to your VPS service.

Locating IP
The first column of the IP Assignments table, “IP”, contains the public IP addresses of your VPS.
RDNS
You can configure your server’s rDNS using the “RDNS” column of the IP Assignments table. Click the entry for the IP you want to change and enter the value you need.
Graphs
The “Graphs” pane shows your server’s network traffic by port for the past 24 Hours, 14 Days, 30 Days, or all available data. You can download the graph as an SVG or PNG, or the data as a CSV, using the menu on the top right of the graph.
