


 Minecraft
 - Troubleshooting an Automatic Install
- Installing a CurseForge Pack
- Download the Server Files
- Upload the Server Files
- Verify Your Forge Installation
- Modpacks that Don’t Ship with Forge
- Find the Forge Version You Need
- Use Install a Different Edition
- Install Forge Manually
- Java Version
- Installing Your Custom Modpack
- Non-Mod Files in the Mods Folder
- Client-Side Mods Crashing the Server
- Missing Dependencies
- Still Not Working?
Install a Minecraft Forge modpack manually when the automatic installer doesn’t work, when the pack doesn’t ship with Forge, or when you’re uploading a custom pack that isn’t on CurseForge.
Troubleshooting an Automatic Install
If you used the automatic installer for a CurseForge pack and the server won’t start, work through these checks first.
- In the Game Control Panel sidebar, click File Manager
- Look for a Forge server jar (named
forge-*.jar,neoforge-*.jar, or similar) - If the Forge jar is missing, see Modpacks that Don’t Ship with Forge
- In the sidebar, click Startup Parameters
- Confirm the Server Jar File field matches the Forge jar name
- Confirm the jar is not the installer (Forge installers end in
-installer.jarand won’t run on the server)
If the jar is the installer, follow Modpacks that Don’t Ship with Forge to install Forge properly.
To install a pack that isn’t on CurseForge, jump to Installing Your Custom Modpack.
Installing a CurseForge Pack
Use this section when the pack is on CurseForge but the automatic installer isn’t working. See Modpack Installation and Common Issues for the automatic flow.
Download the Server Files
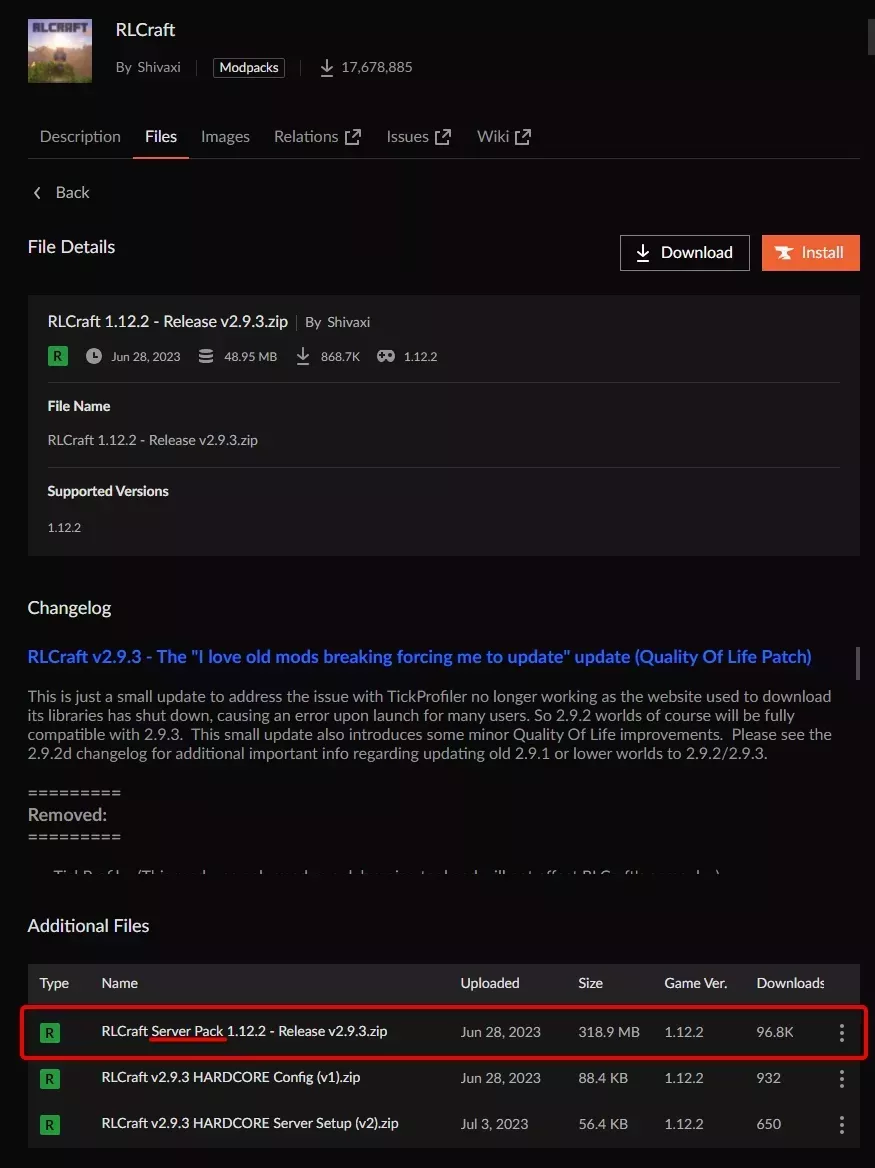
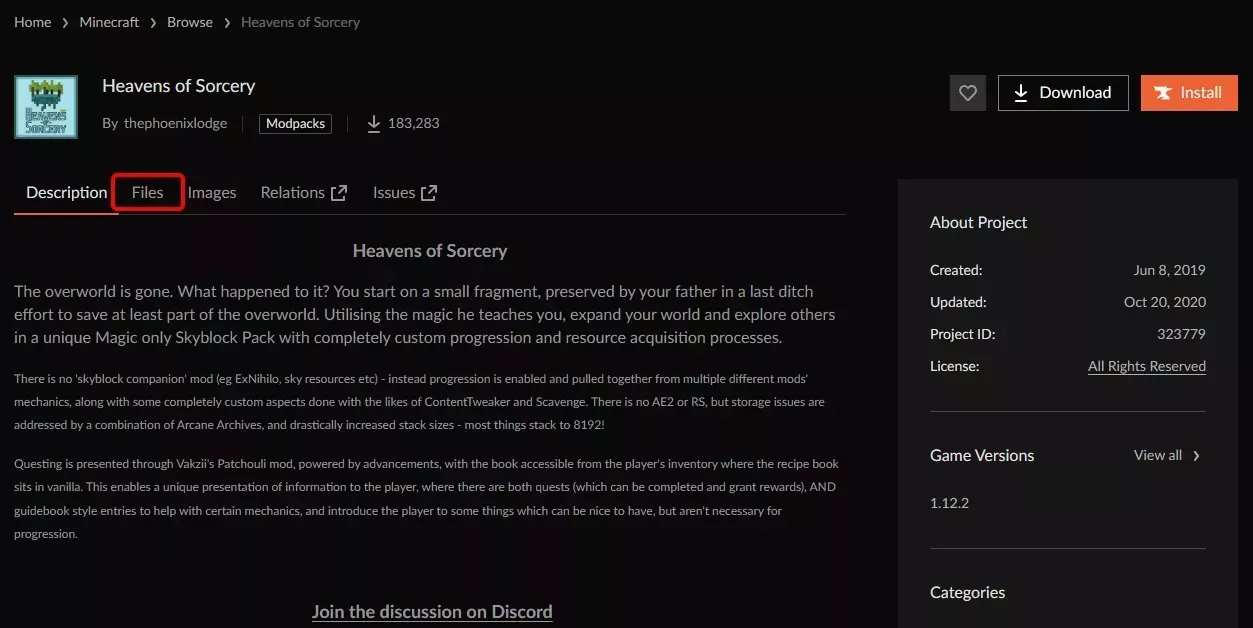
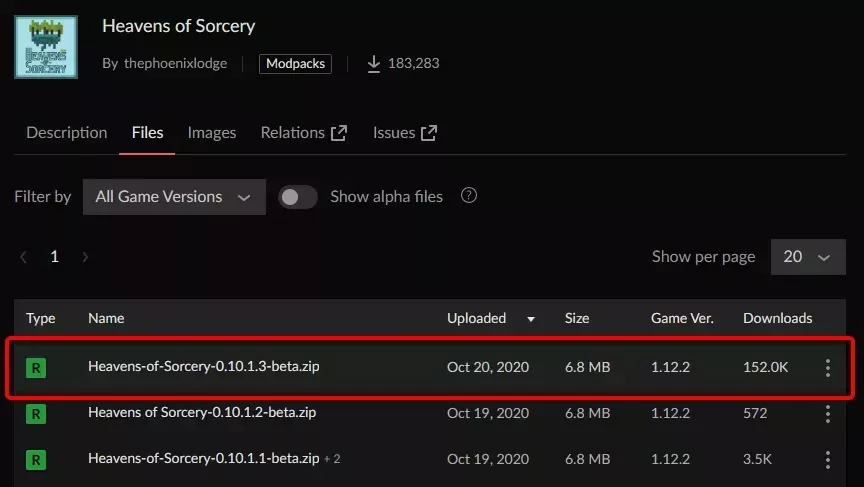
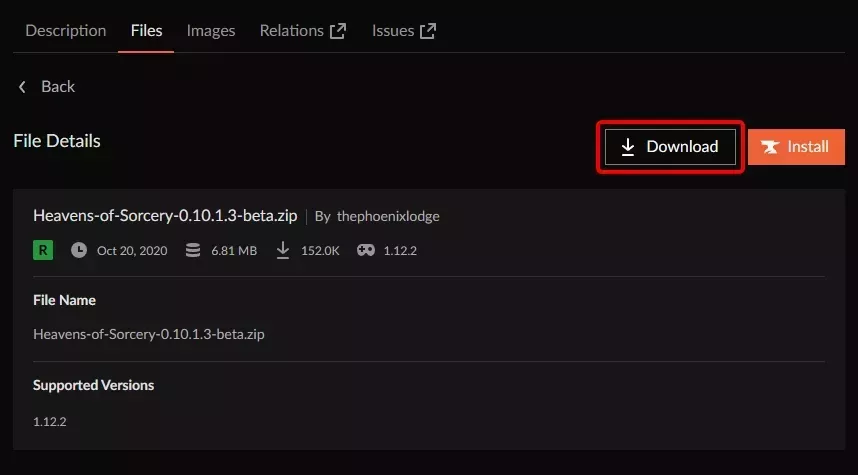
Most CurseForge packs publish server files with each release. Open the pack’s Files tab, select the version you want, and look for the server pack in the Additional Files pane. Some releases skip the server pack, so check the changelog if you don’t see one.
Click the orange download icon next to the server pack. The download can be large because it bundles the mods themselves.
Upload the Server Files
- Connect to your server with SFTP
- Upload the compressed server pack to your server’s root folder
- In the Game Control Panel sidebar, click File Manager
- Right-click the uploaded archive and select Unarchive. See The File Manager for details
Verify Your Forge Installation
After unarchiving, check whether the pack already includes Forge.
- In the File Manager, look for a Forge jar (e.g.
forge-*.jarorneoforge-*.jar) - If Forge isn’t there, follow Modpacks that Don’t Ship with Forge
- If Forge is there, open Startup Parameters in the sidebar
- Set the Server Jar File field to the Forge jar’s exact name
- Click Save
- Start your server
Modpacks that Don’t Ship with Forge
Some modpacks ship without Forge and rely on a post-download installer. WinterNode doesn’t run those installers for security reasons, so you need to install Forge yourself. The Install a Different Edition installer (in Advanced > Server Actions) handles most cases. A few specific Forge builds need a manual upload.
Find the Forge Version You Need
From a CurseForge Pack
Forge versions have two parts: the Minecraft version and the Forge build number. The pack will not work if either is wrong.
To find the exact version, download the client files from the pack’s CurseForge page. Open the Files tab, click the version you need (usually the latest Main File), and click Download on the right side of the File Details pane.
CurseForge downloads a zip containing the pack’s manifest. Extract the zip and open manifest.json in a text editor like Notepad.
The first section defines the Minecraft and Forge versions. The Forge version is the id value under modLoaders. In the example on the right, that’s forge-14.23.5.2854.
"minecraft": {
    "version": "1.12.2",
    "modLoaders": [
      {
        "id": "forge-14.23.5.2854",
        "primary": true
      }
    ]
  }
From a Custom Pack
If you built the pack in the CurseForge app or a third-party launcher like MultiMC, check the launcher’s profile settings.
- CurseForge app: export the pack as you would to share it, then follow the steps above for a CurseForge pack
- MultiMC: open the instance settings and check the Version section
Use Install a Different Edition
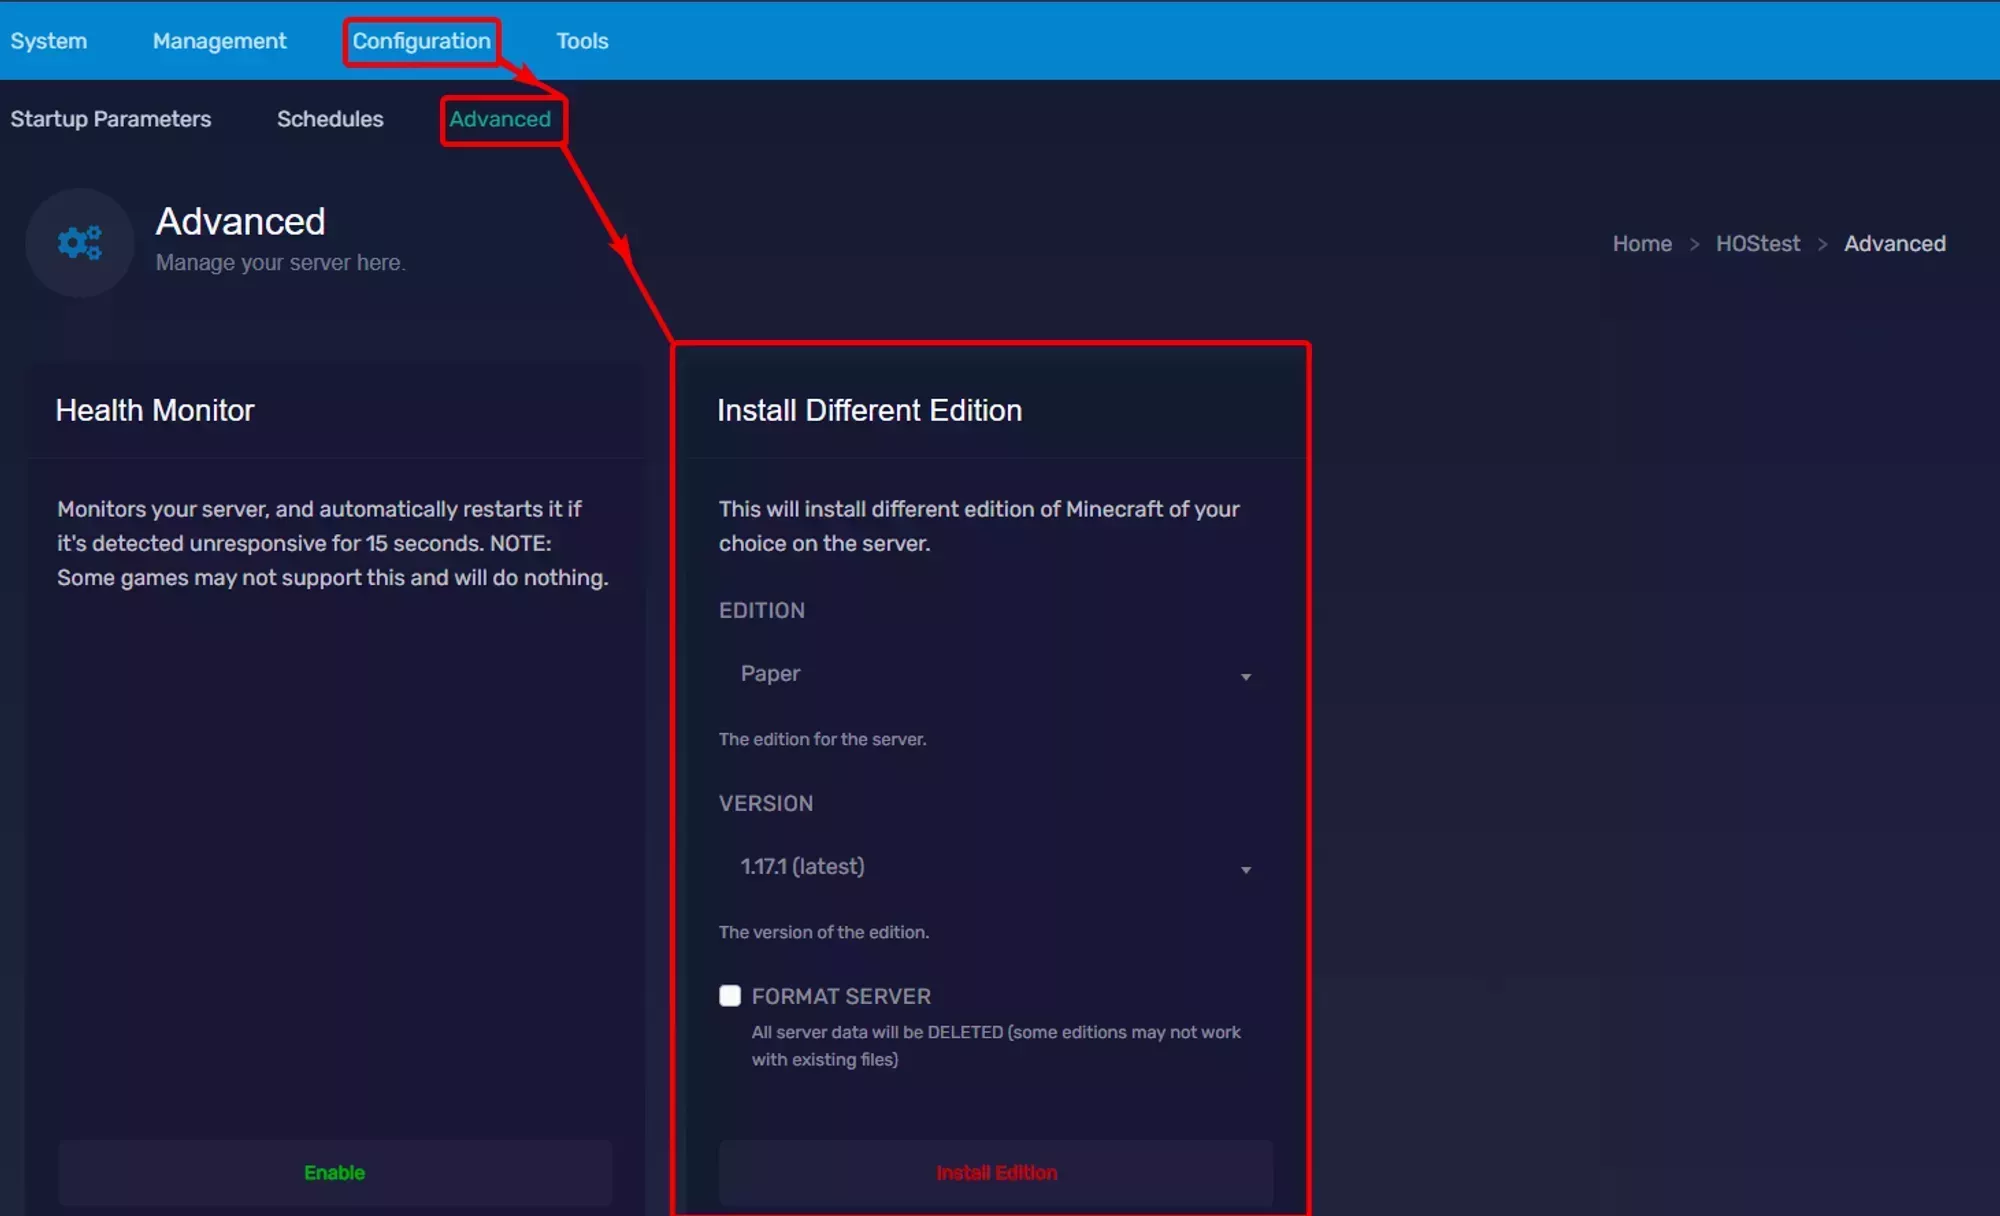
The Install a Different Edition panel covers most current Forge versions. You’ll find it under Advanced > Server Actions in the Game Control Panel sidebar.
- In the Game Control Panel sidebar, go to Advanced > Server Actions
- In the Install a Different Edition panel, select Forge from the Edition dropdown
- Set Minecraft Version to the Minecraft version your modpack uses (for example,
1.20.1) - Set Version to the exact Forge build your modpack needs (see Find the Forge Version You Need)
- Leave Format Server off so your existing files aren’t deleted
- Click Install Different Edition and wait for the install to finish
The installer sets the Server Jar File for you, so you don’t need to touch Startup Parameters afterwards.
Install Forge Manually
Use this path when Install a Different Edition (under Advanced > Server Actions) doesn’t carry the specific Forge build your pack needs.
Download the Installer
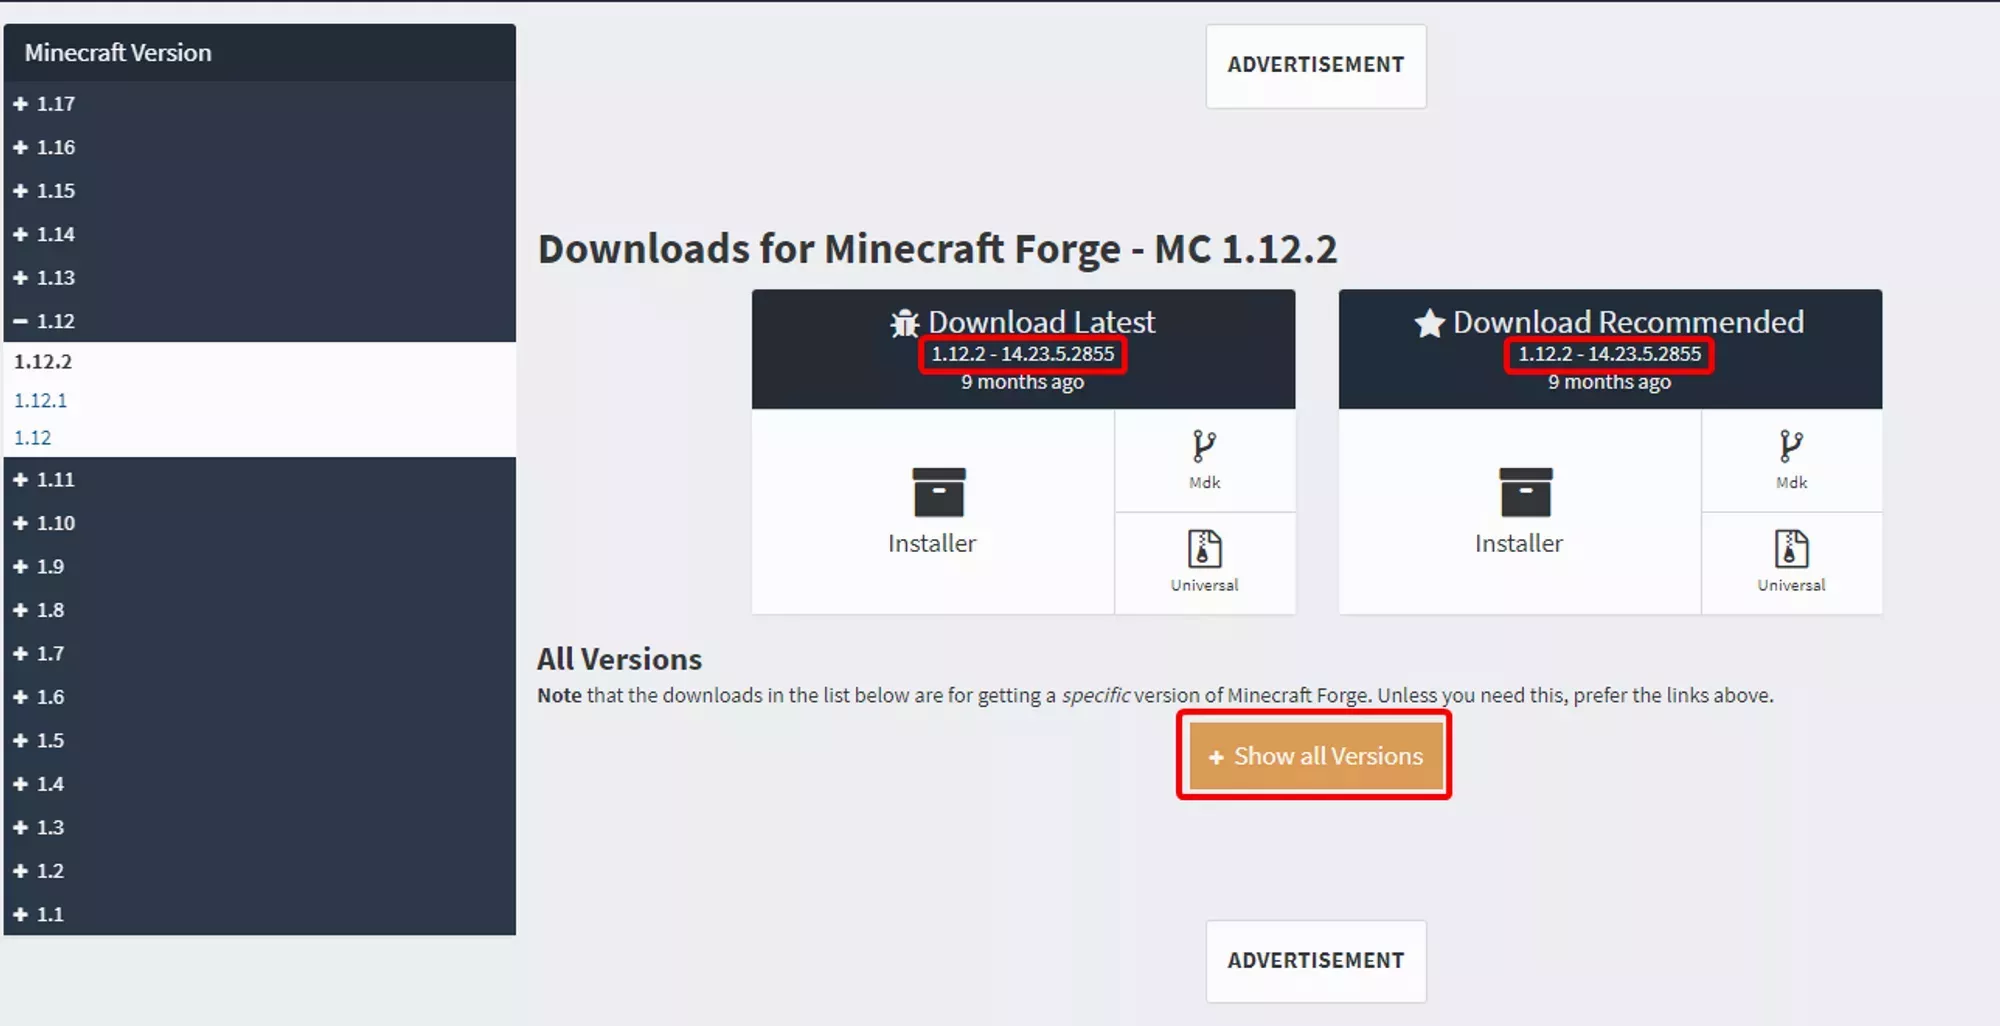
Open the Forge website and pick your Minecraft version from the left panel. Each version page shows Recommended and Latest Forge builds.
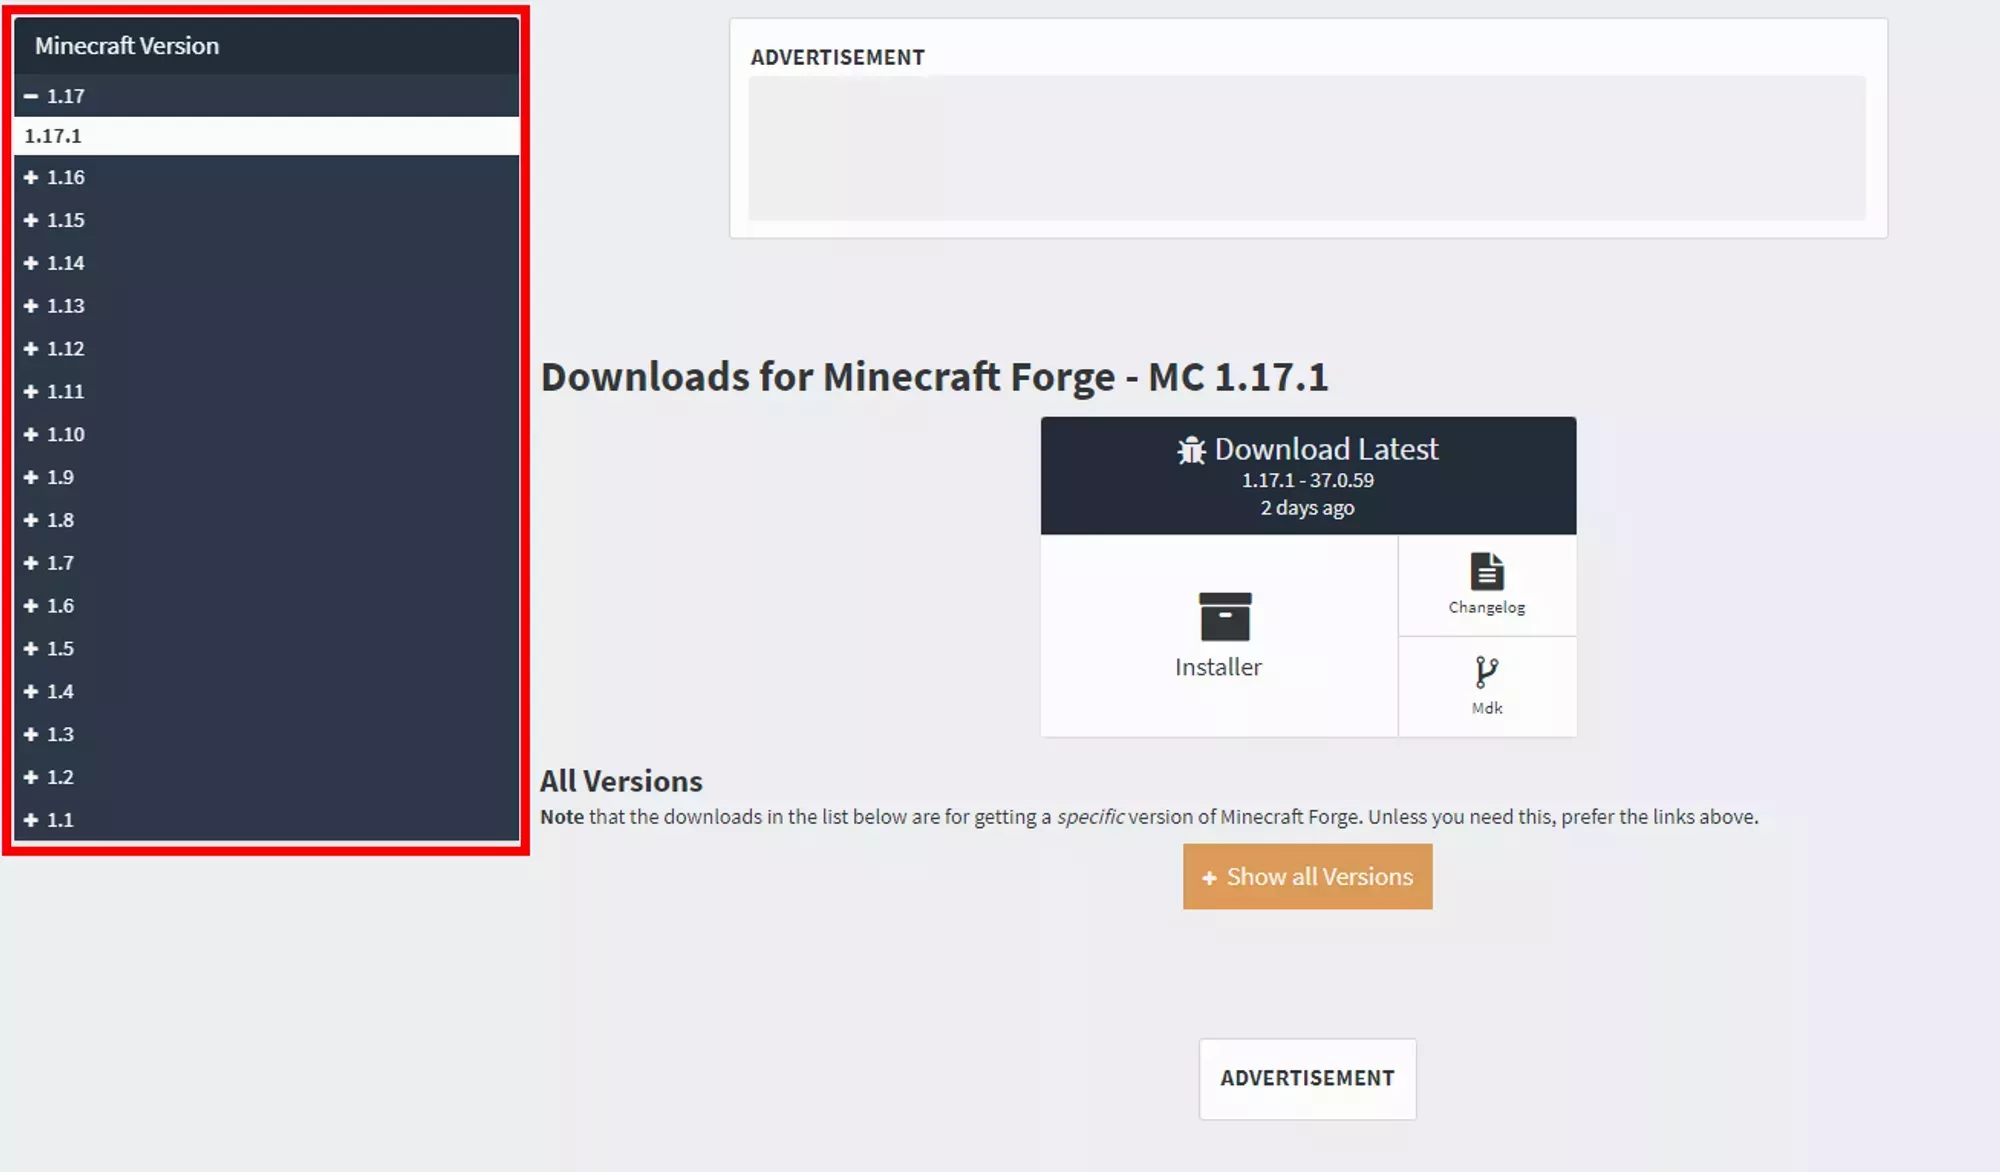
Compare the build number from What Version of Forge Do I Need? with the Recommended and Latest builds. If neither matches, click Show all Versions to see the full list.
Versions are sorted by release date. Match by the last four digits of the build number. For build 14.23.5.2839, scan the list for 2839.
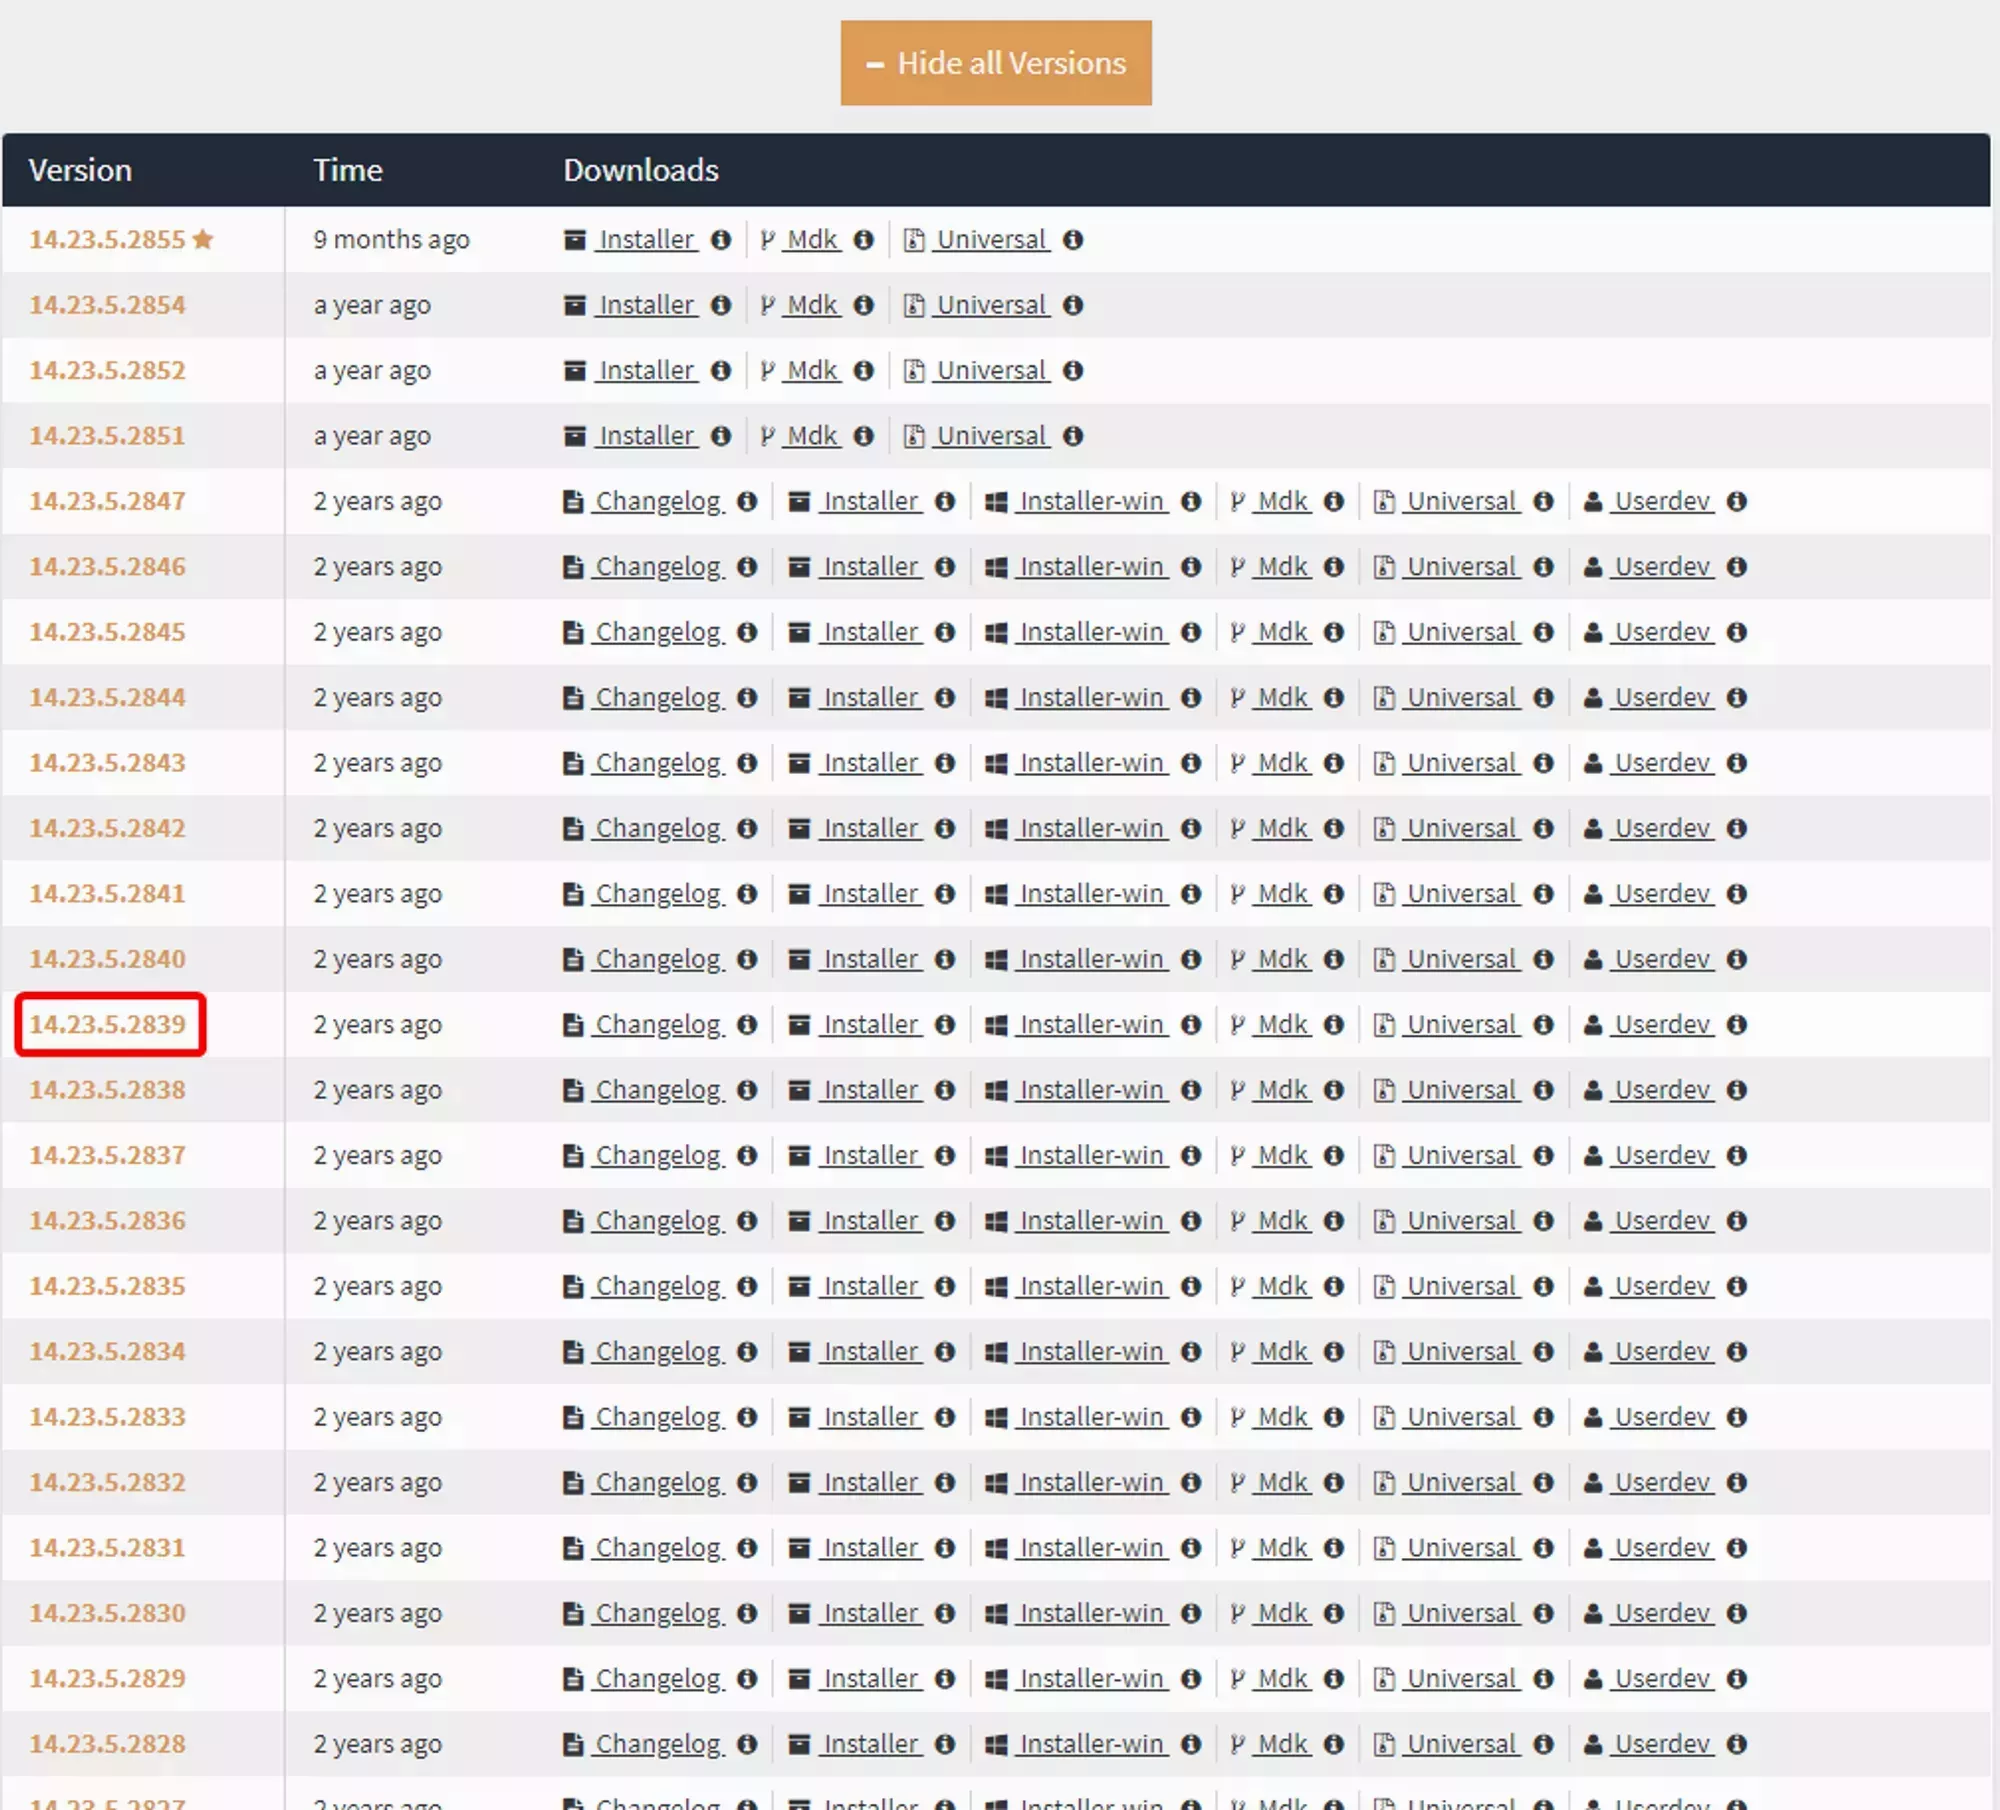
Once you find the right build, click Installer in the Downloads column. The link opens an ad page that supports the Forge developers.
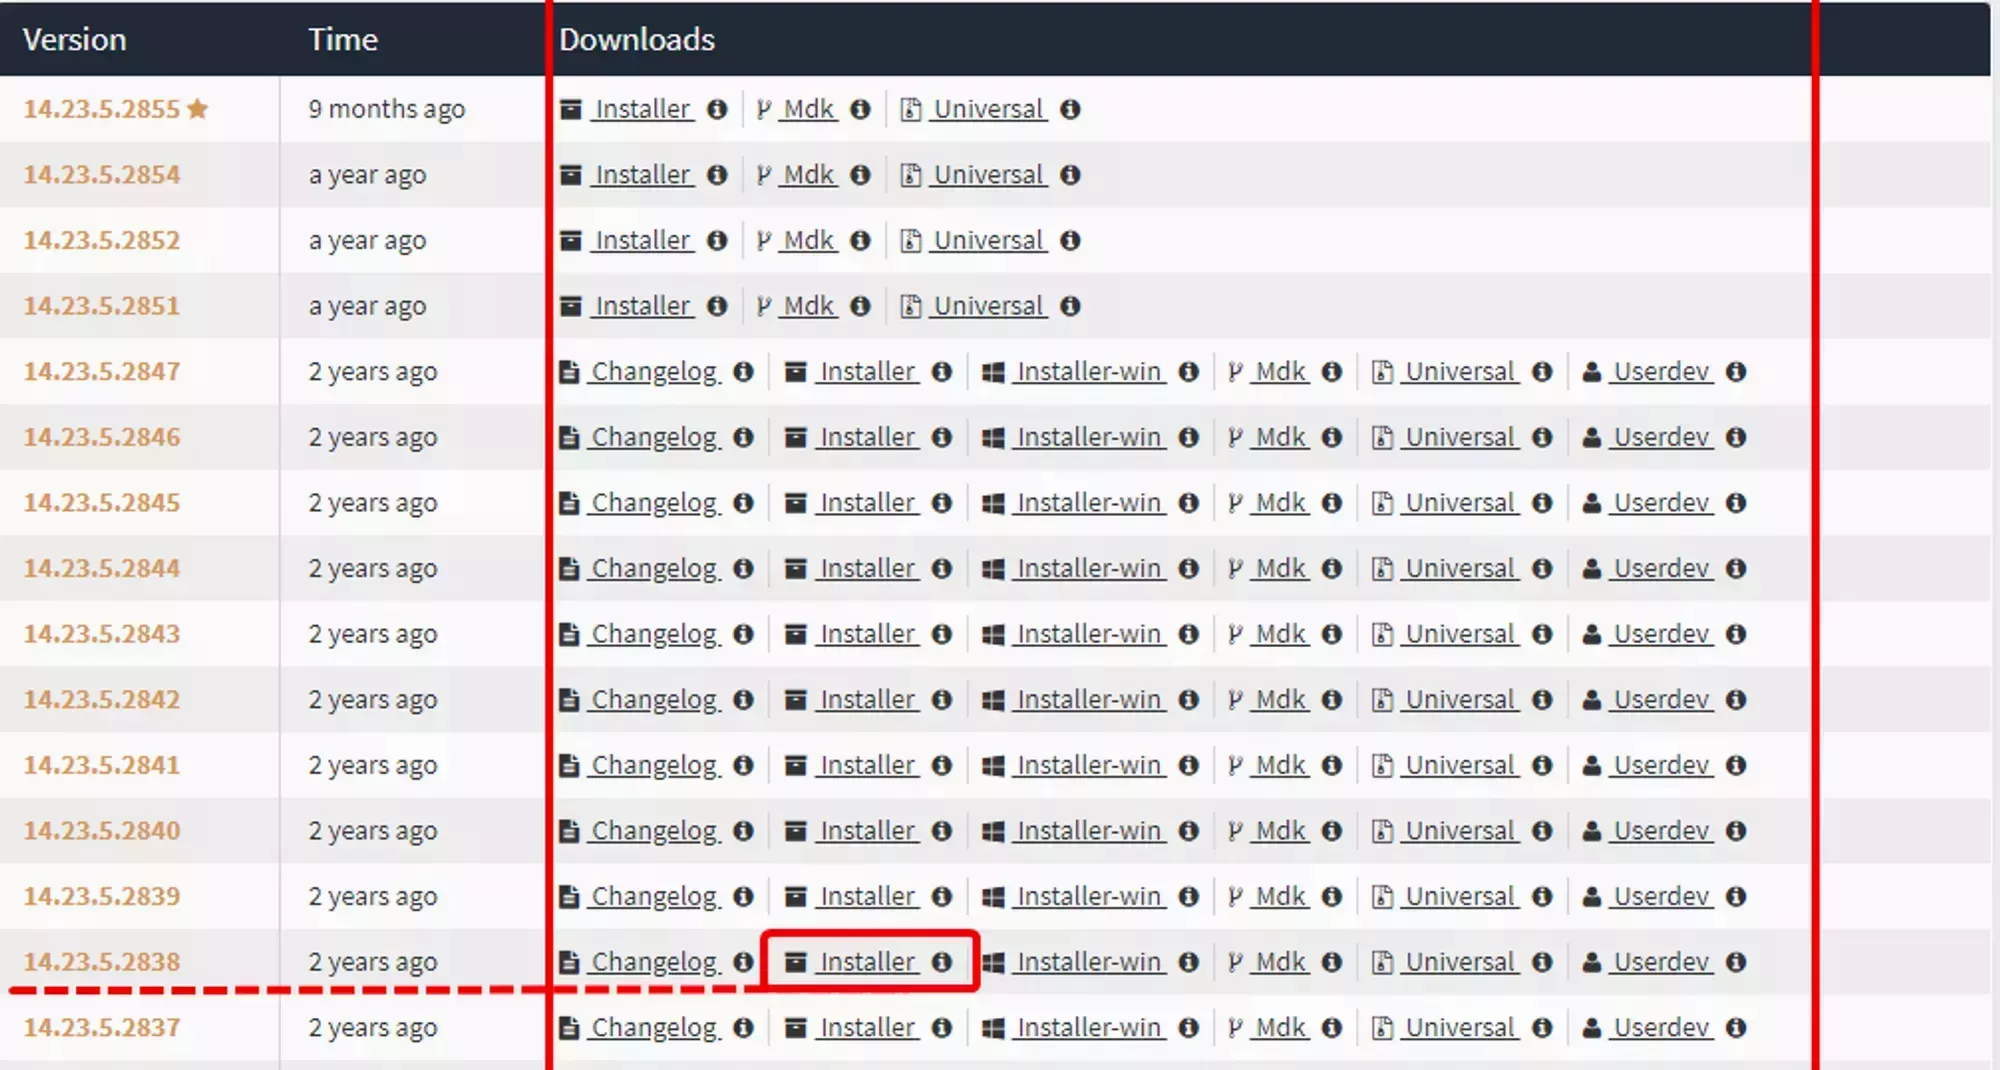
After 6 seconds, a Skip button appears in the top right. Click it to start the download. Files follow this naming pattern:
forge-<Minecraft-Version>-<Forge-Version>-installer.jarFor the example above, the file is forge-1.12.2-14.23.5.2839-installer.jar.
Run the Installer
Run the installer on your own PC. You need Java installed.
- Open the installer with Java
- Select Install Server
- Click the three dots next to the path field and pick an empty folder you can find later
- Click OK to start the install
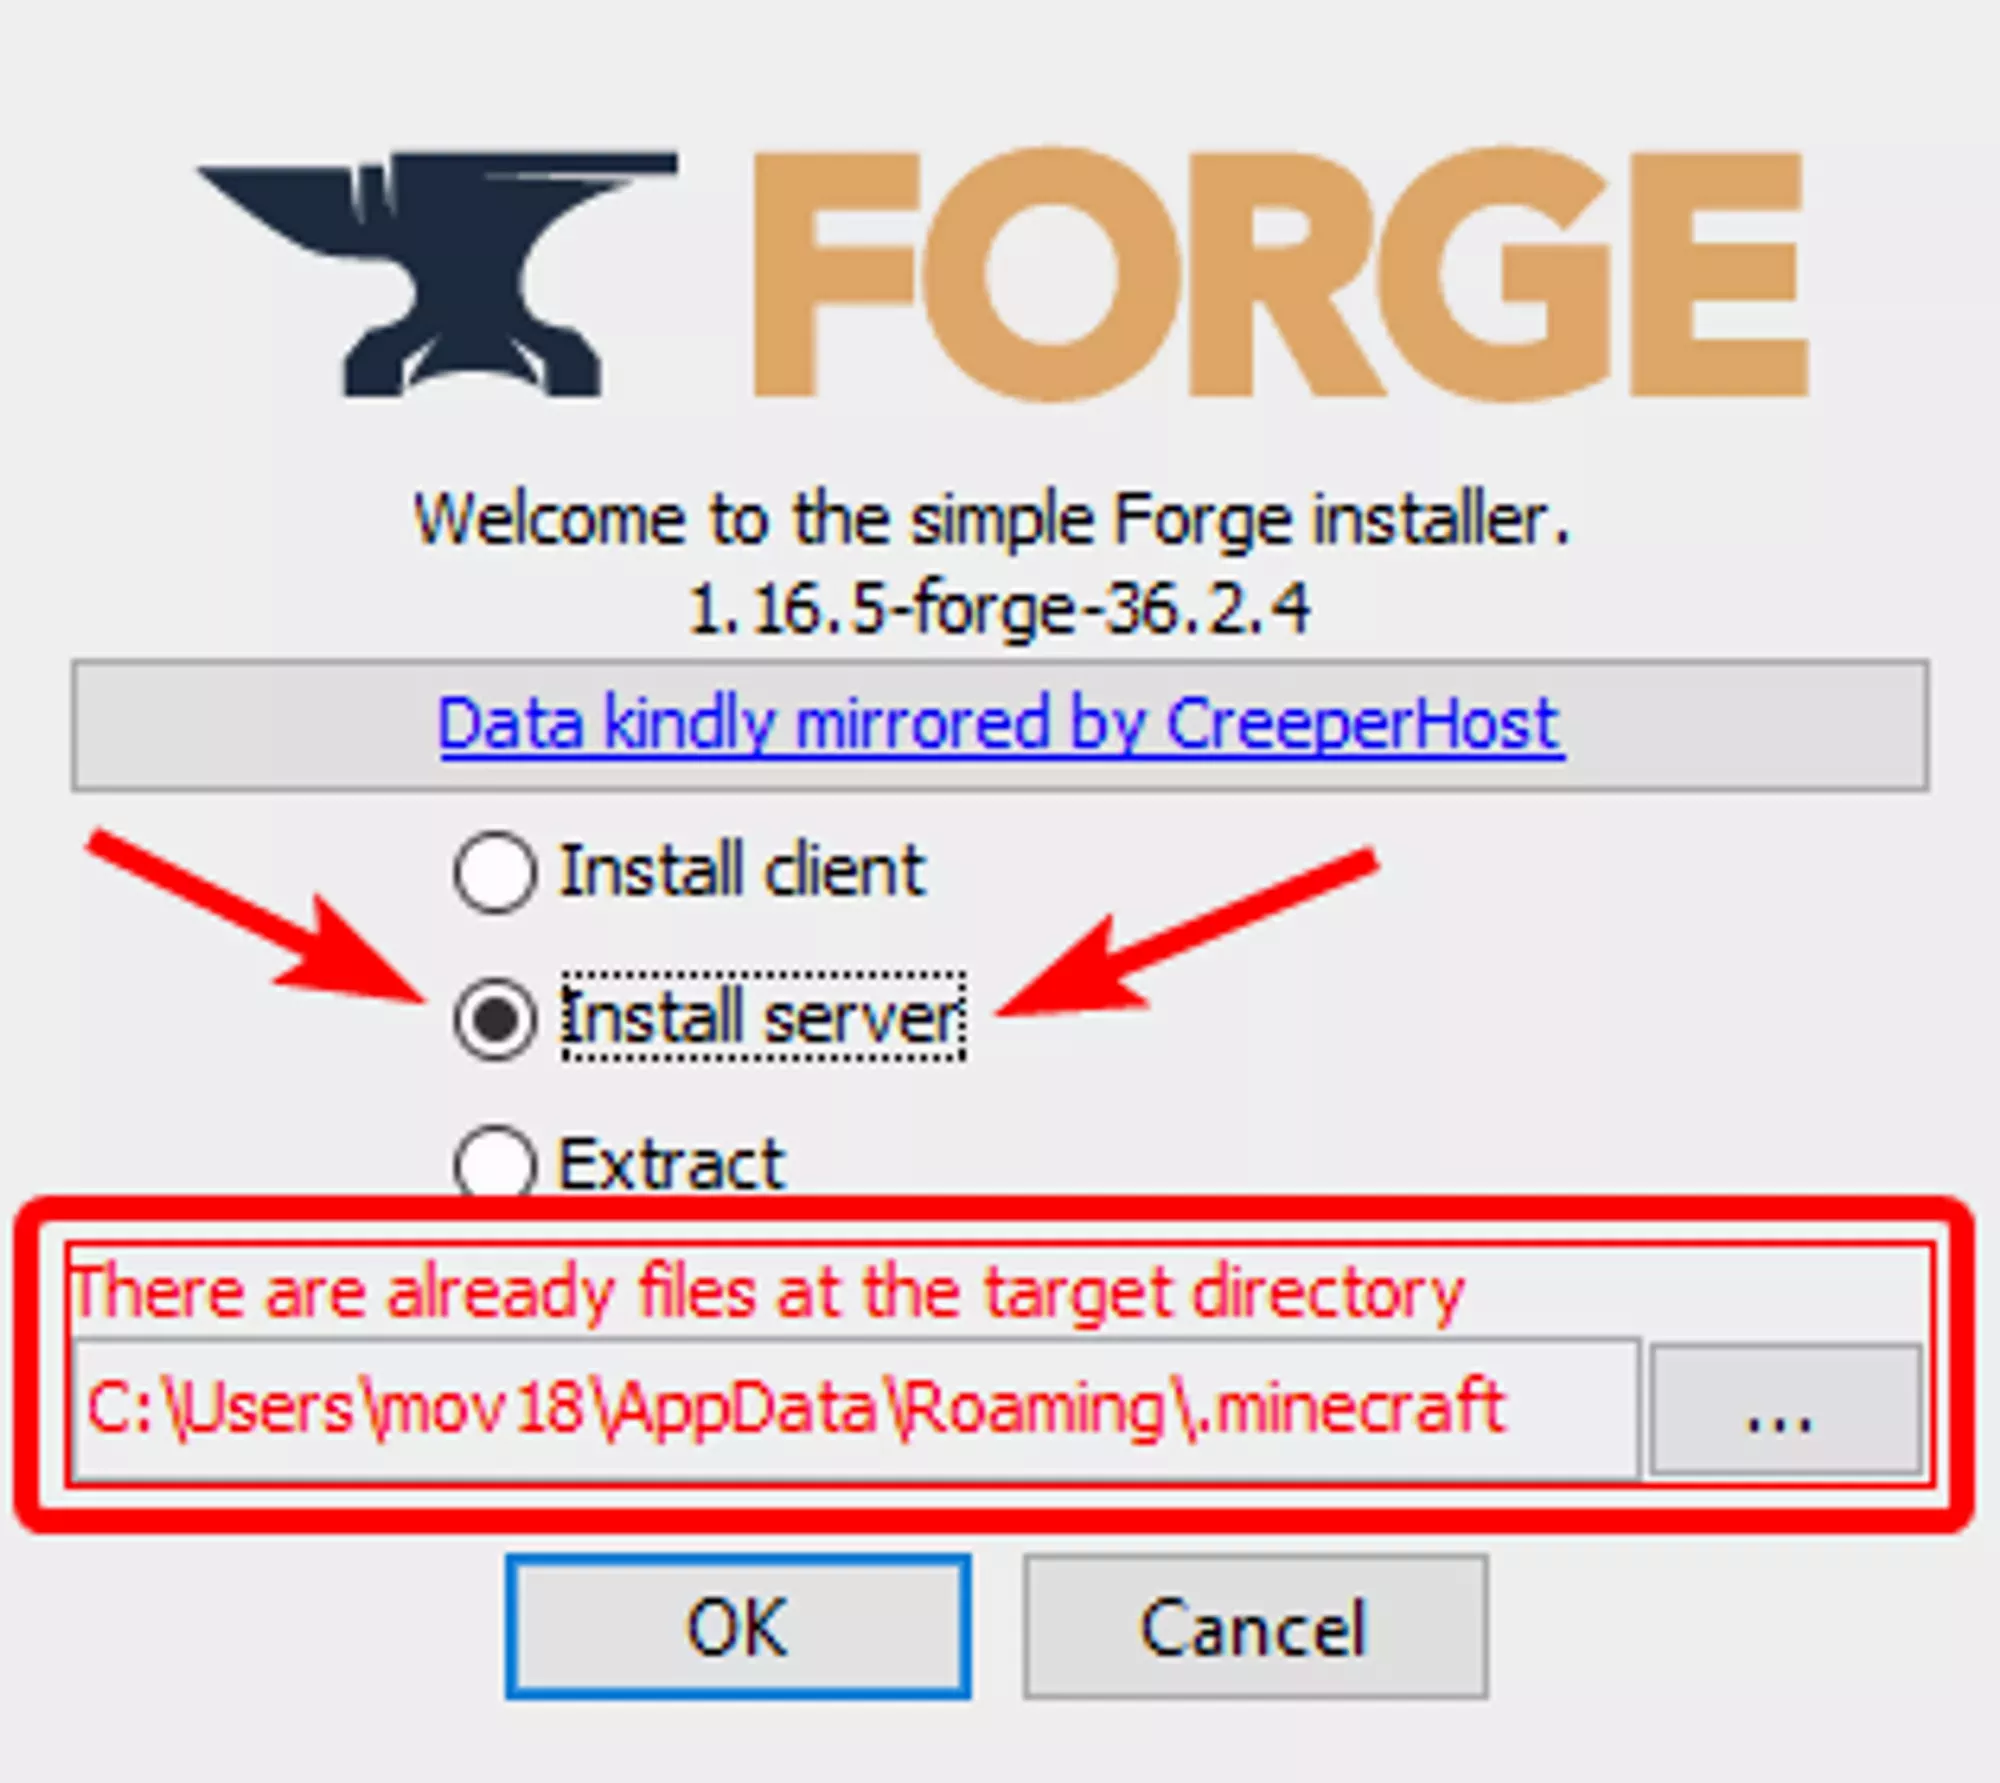
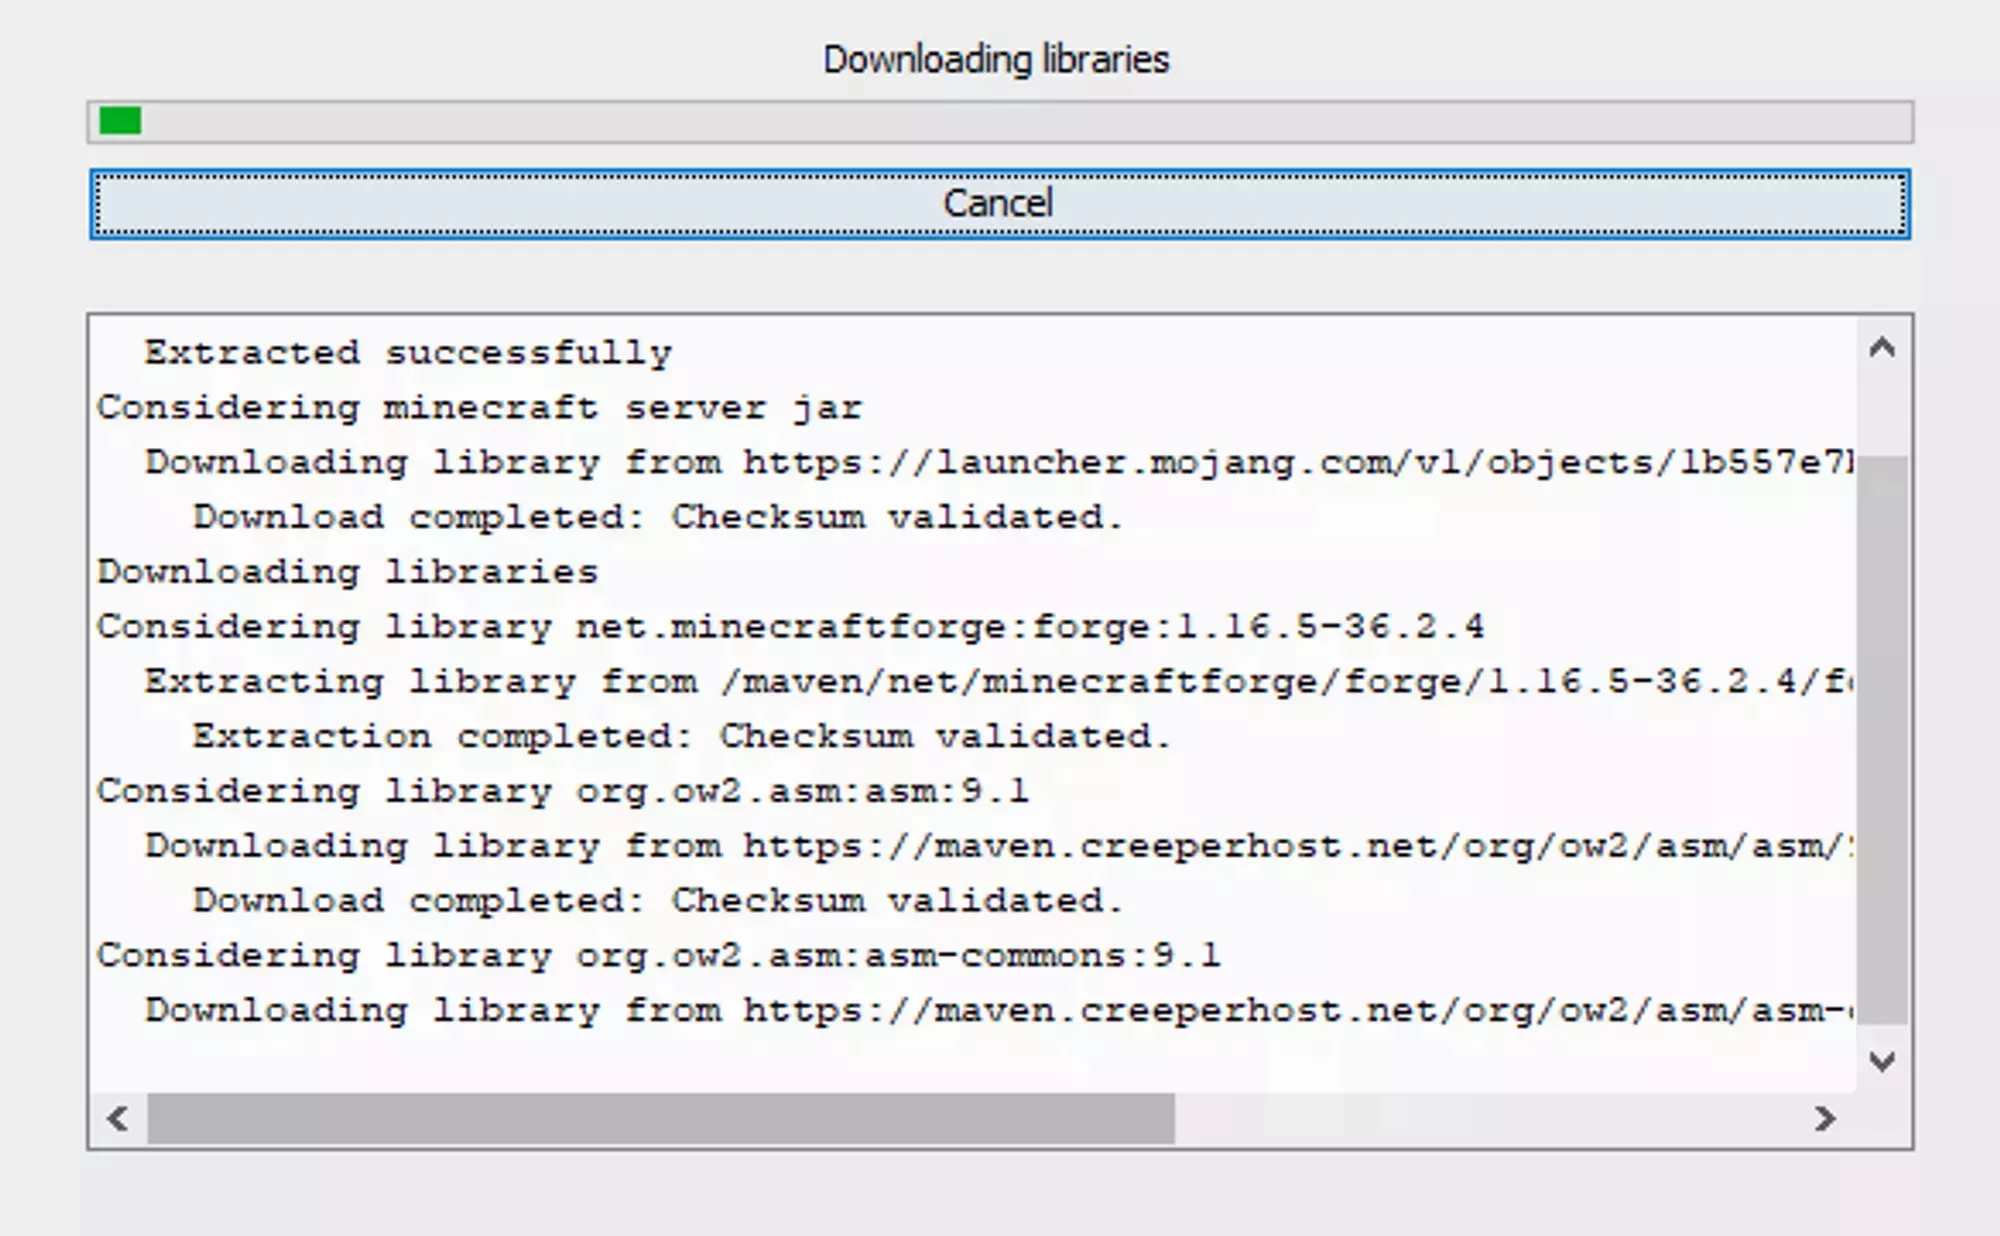
The installer shows a progress window. When it’s finished, you’ll see a success message.

Upload Forge to Your Server
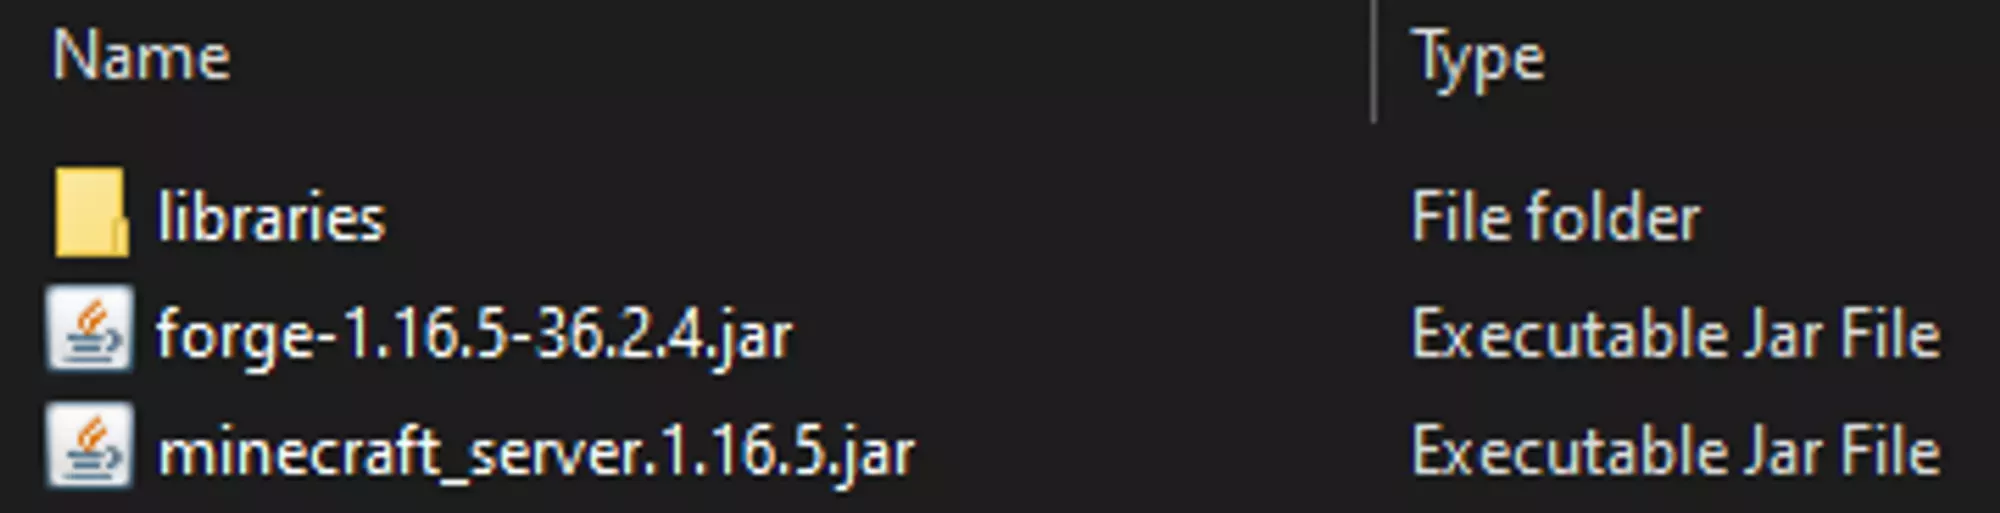
The installer produces three things you need to upload:
- The
librariesfolder forge-<Minecraft-Version>-<Forge-Version>.jarminecraft_server.<Minecraft-Version>.jar
Compress all three into a single archive before uploading. All three are required for Forge to start.
- Connect to your server with SFTP and upload the archive
- In the Game Control Panel sidebar, click File Manager
- Right-click the archive and select Unarchive
Set the Server Jar
- In the sidebar, click Startup Parameters
- Set the Server Jar File field to the exact name of the
forge-*.jarfile you uploaded - Click Save
- Start your server
Java Version
The wrong Java version can stop Forge, mods, or Minecraft from starting. If your server is crashing with strange errors, check that you’re running the recommended Java version. See Java Version Selection for instructions.
| Minecraft version | Java version |
|---|---|
| 1.12 to 1.16 | Java 8 |
| 1.17 to 1.20 | Java 17 |
| 1.21+ | Java 21 |
Installing Your Custom Modpack
If you built your own pack with Forge, install Forge first using one of the methods above. The errors below are the most common issues when building server files for a custom pack.
Non-Mod Files in the Mods Folder
Forge will try to load any file in the mods/ folder, even files that aren’t mods. This usually causes problems later for no obvious reason.
If Forge finds a non-mod file, it logs a warning during startup with the file name:
[Server thread/INFO] [FML]: FML has found a non-mod file <MODFILE> in your mods directory. It will now be injected into your classpath. This could cause severe stability issues, it should be removed if possible.Remove any files listed in that warning from the mods/ folder.
Client-Side Mods Crashing the Server
Some mods only run on the client. Adding one to the server’s mods/ folder will crash the server when it tries to load client-only code. It’s fine to keep these mods on your own client. Just don’t put them on the server.
When a client-side mod is the cause, the crash log shows for invalid dist DEDICATED_SERVER. For example, the Falling Leaves mod produces this:
[main/FATAL] [ne.mi.fm.lo.RuntimeDistCleaner/DISTXFORM]: Attempted to load class de/cheaterpaul/fallingleaves/mixin/ParticleManagerMixin for invalid dist DEDICATED_SERVERThe class path identifies the mod. Here, de/cheaterpaul/fallingleaves/mixin/ParticleManagerMixin points to the mod fallingleaves from cheaterpaul.de.
If the class path doesn’t make the mod name obvious, check each mod in your pack and remove any that are client-only. Multiple client-only mods can be present at once, so remove every one you find.
Missing Dependencies
Many Forge mods need other mods (libraries or feature mods) to run. If a dependency is missing, Forge crashes on startup and prints the missing mod’s name and version:
[Server thread/FATAL] [FML]: net.minecraftforge.fml.common.MissingModsException: Mod tconstruct (Tinkers' Construct) requires [mantle@[1.12-1.3.3.49,)]In this example, Tinkers’ Construct 2.13.0.183 on 1.12.2 needs Mantle 1.3.3.49. Download the exact version Forge asks for. If the mod is already installed, check that the version matches.
Still Not Working?
If none of the above solutions resolve your issue, contact our support team with:
- Your Server UUID
- The last 50 lines of your console output
- The name and version of the modpack you’re installing
Frequently Asked Questions
Download the client zip from the modpack's CurseForge Files tab, extract it, and open `manifest.json`. The `id` value under `modLoaders` is the Forge version you need (for example, `forge-14.23.5.2854`).
No. The version installer sets the Server Jar File automatically. You only need to set it yourself when you upload Forge or a modpack manually.
A client-side mod is in your `mods/` folder. Find the mod named in the error (usually in the class path) and remove it from the server.